While watching the Walking Dead the other night, I started making an ear warmer. Well, somewhere along the way, I got side tracked and ended up with a slouchy hat. Many have asked for the pattern, so I figure I’ll go ahead and share my happy little accident. 🙂
This hat is super easy and worked from the bottom up, starting with the band. It can be customized to fit any head.
THIS HAT NEEDS A NAME! If you have an idea, let me know. 🙂
I apologize in advance. I do not have any progress photos. Only completed. This was kind of a last minute write up, as I didn’t want to forget to do it. If you catch any mistakes, or have questions, leave a comment and I’ll get back to you as soon as I see it!
So, without further ado…
Things you’ll need:
5.5 mm hook
Any color worsted weight yarn
Tapestry needle
Ruler for measuring length
Stitch Abbreviations:
CH – Chain
SC – Single crochet
BLO – Back loop only
SS – Slip stitch
DCBLO – Double crochet back loop only
FPTC – Front post treble crochet
Row 1: Make a CH 9, SC in 2nd CH from hook, and in each CH across. CH 1, turn. (8)
Row 2: SC in 1st stitch, SC in BLO in next 6, SC in last stitch. CH 1, turn. (8)
Row 3: Repeat row 2 until band reaches desired length, making sure your last row ends on the opposite side of your starting tail.
Child size – approximately 19″
Small adult – approximately 20″
Medium/large adult- approximately 21″
Fold the band in half creating a circle. SS across the band using the BLO on your ending row. If you ended correctly, your starting tail should be where we will start the top of the hat. Flip the band inside out, so that you are now working on the opposite side.
Row 4: CH 1, SC in each end stitch on your band, working over the beginning tail. Join with a SS to first SC. DO NOT TURN. (Number of SC will vary depending on how many rows you made)
Row 5: CH 2, DCBLO in each stitch around. Join with a SS to first DCBLO.
Row 6: CH 2, *[FPTC around post of first DC, DC in next] *Repeat around. Join with a SS in the top of the first FPTC (Your last completed stitch should be a FPTC)
Row 7: CH 2, *[FPTC around post of FPTC from previous row, DC in next] *Repeat around. SS to first FPTC.
Row 8: Repeat row 7 until you’ve reached your desired length.
(The more rows you add, the more slouch your hat will have)
For a child’s hat, total length from bottom of band to top of hat should be around 8″
For a medium/large adult hat, total length from bottom of band to the top of hat should be around 9″
Leave a long tail and use your tapestry needle to weave through all your stitches in the last row. Pull string tight to cinch it closed.
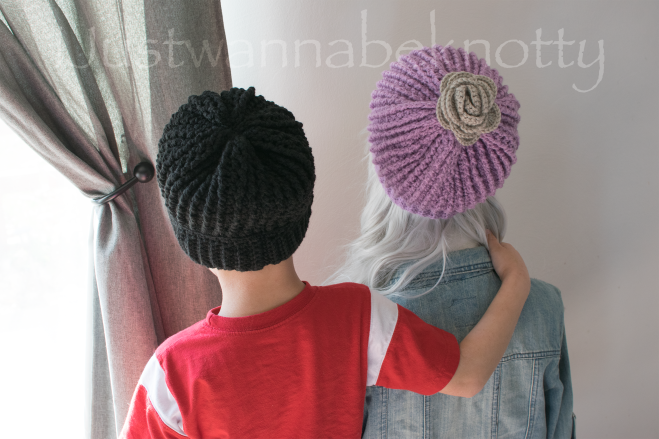
You will likely have a small hole at the top, this is an easy fix! when you pull tight, you can just use your tail to weave back and forth across the hole to pull it together. Or you can add a pom pom, or flower (Like I did!) Really, the possibilities are endless! You can even leave the hole, as some actually like the look…whatever tickles your fancy! 🙂
Hope you enjoy making this slouchy hat! It really is sooo fast to whip up, that you can make enough for a small army in no time. Happy hooking!!


———————————————————————————-
Pattern is for the hat only.
Any embellishments, or pom pom patterns are up to you to create and choose!
The rose is a free pattern I found HERE … So clicky clicky and follow their tutorial if you’d like a flowery hat like mine!
Photos are property of Bobbie Wojton, aka, IJustWannaBeKnotty, please do not use and share them as your own.
Any likeness or similarities to any other patterns is pure coincidence.
You are free to sell anything you create from this pattern. Go ahead with yo’ bad self, make that money! 🙂 Buuuuut, if you get rich off this pattern and are feeling generous, feel free to donate via the link on my blog.
