Click the download link above to get the pdf!
Please keep in mind that it is an untested and text only pattern. But hopefully it’s easy enough to follow! 🙂

Click the download link above to get the pdf!
Please keep in mind that it is an untested and text only pattern. But hopefully it’s easy enough to follow! 🙂
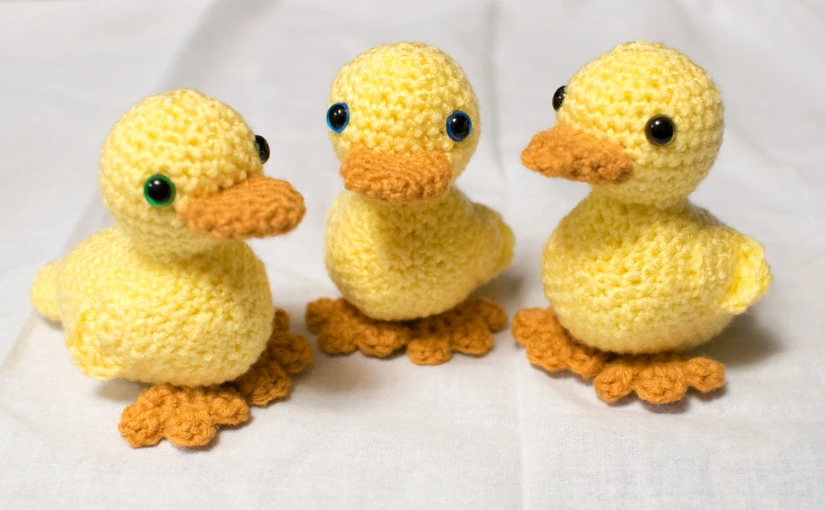
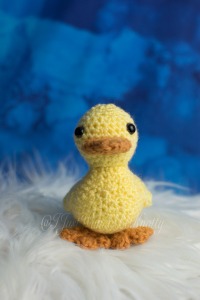
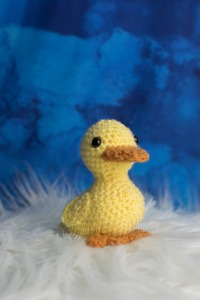
A quick write up of my baby peep pattern. There is no photos, other than the finished product… so this definitely isn’t a beginner friendly version right now. As soon as I can, I will have a more in depth pattern available…I just am unable to get it typed and finished at this time.
For the most part it should be pretty self explanatory for stitches and sewing together. Some pieces mimic parts from my “waffles the duck” pattern, so you may be able to look HERE for some photos to help. 😊
I wanted to get this out there for those who may need a quick project for Easter…which is approaching fast!


Please let me know if there’s any issues opening the file! 👇🏻👇🏻
Pattern and photos are property of Bobbie Wojton Aka, I Just Wanna Be Knotty. Please do not claim them as your own. Any likeness to any other pattern is pure coincidence as I did not follow any pattern to create this.
Pattern may be not be shared, in part or full, on any other social media platform. If you wish to share it with someone, please link back to this post.
Items made from this pattern may be sold. 😊
If you enjoy this pattern, or create it with the intent to sell your finished project, please consider donating. Donations help keep me motivated enough to create patterns for everyone (and not just myself, lol) You can do so here! If you donate, you may enter a note requesting a copy of the pdf. which I can forward to the email provided.
If you run into any issues, or have comments about this pattern, feel free to contact me by leaving a comment or sending a message to one of my connected accounts.
Finished project size ~ 4.5”x5”
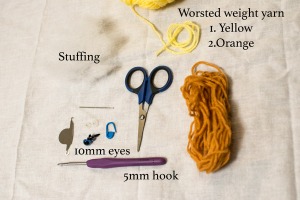
Things you’ll need:
5mm crochet hook (or smaller if you find holes between stitches too large)
Worsted weight yarn, I used Red Heart in color Lemon
Little bit of orange yarn in worsted
10mm safety eyes (or make yarn eyes if for a small child)
Stitch legend-
mr – Magic Ring
sc – single crochet
hdc – half double crochet
dc – double crochet
trc – treble crochet
inc – increase
inv dec – invisible decrease
FO – fasten off
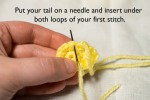
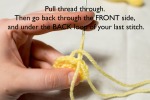
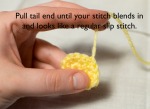
Inv ss – invisible slip stitch* see photos below
Pattern notes:
*This pattern is written in a continuous round for all pieces except the feet.
*Use a stitch marker in the first stitch of each round.
*Written in US terms.
*Directions between [ ] means to repeat the number of times immediately following.
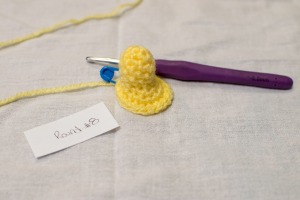
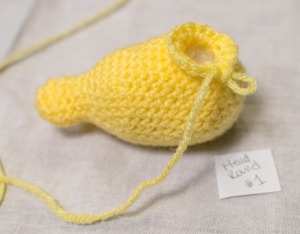
Body:
1: Start with a mr, sc 6 in the ring (6)
2: inc in each stitch around (12)
3-4: sc in each stitch around (12)
5: [inv dec]*2, sc in next 3, [inc]*2, sc in next 3 (12)
6: sc 4, [inc, sc]*repeat 3 times, sc 2. (15)
7: [inv dec]*2, [sc, inc]*until one stitch remains. sc in last. (18)
8: sc in each stitch around (18)
9: [inc, sc 2]*to end (24)
10: [inc, sc 3]*to end (30)
11-12: sc in each stitch around (30)
13: inv dec, sc in next 2, inv dec, sc in next 24 (28)
14: sc in next 9, inc, sc in next 14, inc, sc in next 3 (30)
15-20: sc in each stitch around (30)
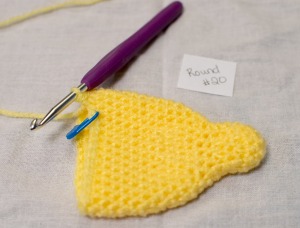
21: sc in first 3, ch 3, skip 3 stitches, sc in next 24. (30)
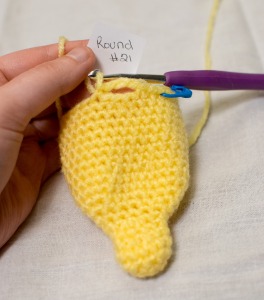
22: sc, inv dec, sc 3 (Making sure to work in the chain stitches, not around them!), inv dec, [sc 3, inv dec]*repeat around until 2 stitches remain. sc in last 2. (24)
23: sc, inv dec, [sc 2, inv dec]*around until 1 stitch remains, sc. (18)
24: [inv dec, sc1]*around (12)
25: inv dec around. Leaving a long tail, cut your yarn and fasten off with an inv ss. Taking your tail; insert it through the front loop only of each stitch Pull tight until your hole disappears. Weave in the end.
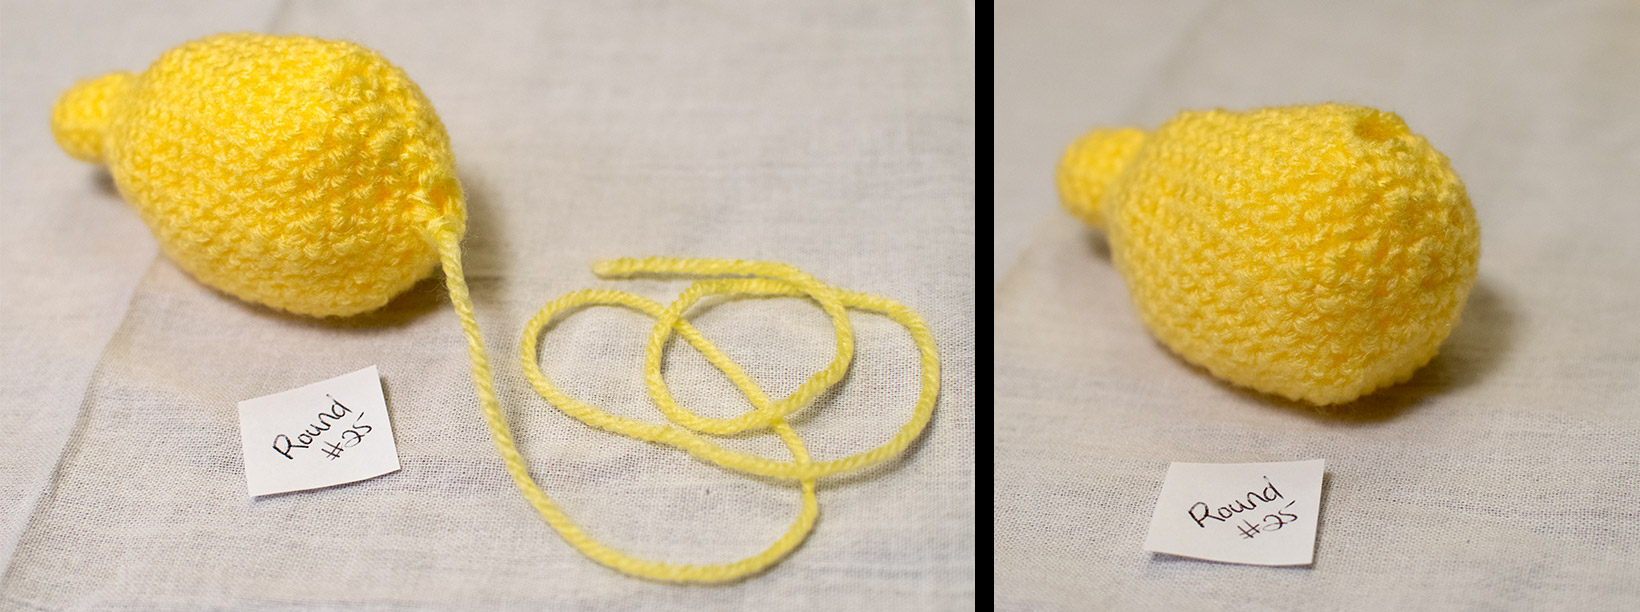
Start stuffing the body through the hole we created on the top of the body. Leave the little tail nub unstuffed or LIGHTLY stuff it. You want it to be kind of flat so it looks like tail feathers.
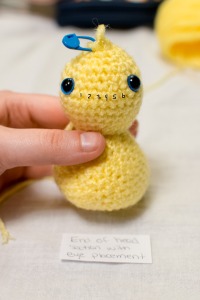
Head:
1: Join yarn in any stitches that we left open on the body. inc in each stitch around. You should end up with 18 stitches. (18)
2: [sc 2, inc]*repeat around (24)
3: [sc 3, inc]*repeat around (30)
4-7: sc in each stitch around. (30)
8: [sc 3, inv dec]*around (24)
9: sc around (24)
10: [sc 2, inv dec]*repeat around (18)
*About this time is when you want to insert the safety eyes if you are using them. They should be placed between rows 7/8. You want to have 6 stitches showing between the eyes, because then you’ll be able to easily line up your duck bill for sewing (which will be 6 stitches per side) Once the eyes are placed, start stuffing the head and continue stuffing as you go.
11: sc, inv dec around (12)
12: sc around (12)
13: Inv dec around. FO and finish the same way as done on the body. (6)
Wings (make 2):
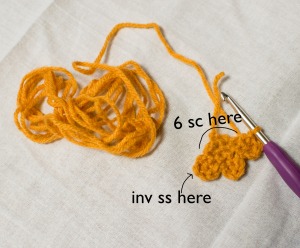
1: mr, sc 6 in ring.
2: inc in each stitch around
3: sc, hdc. in the next stitch: dc, trc, dc. hdc, sc fasten off with an inv ss.
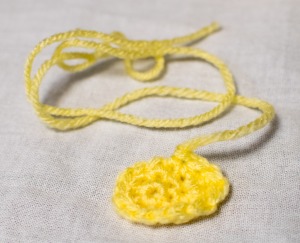
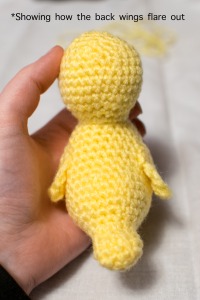
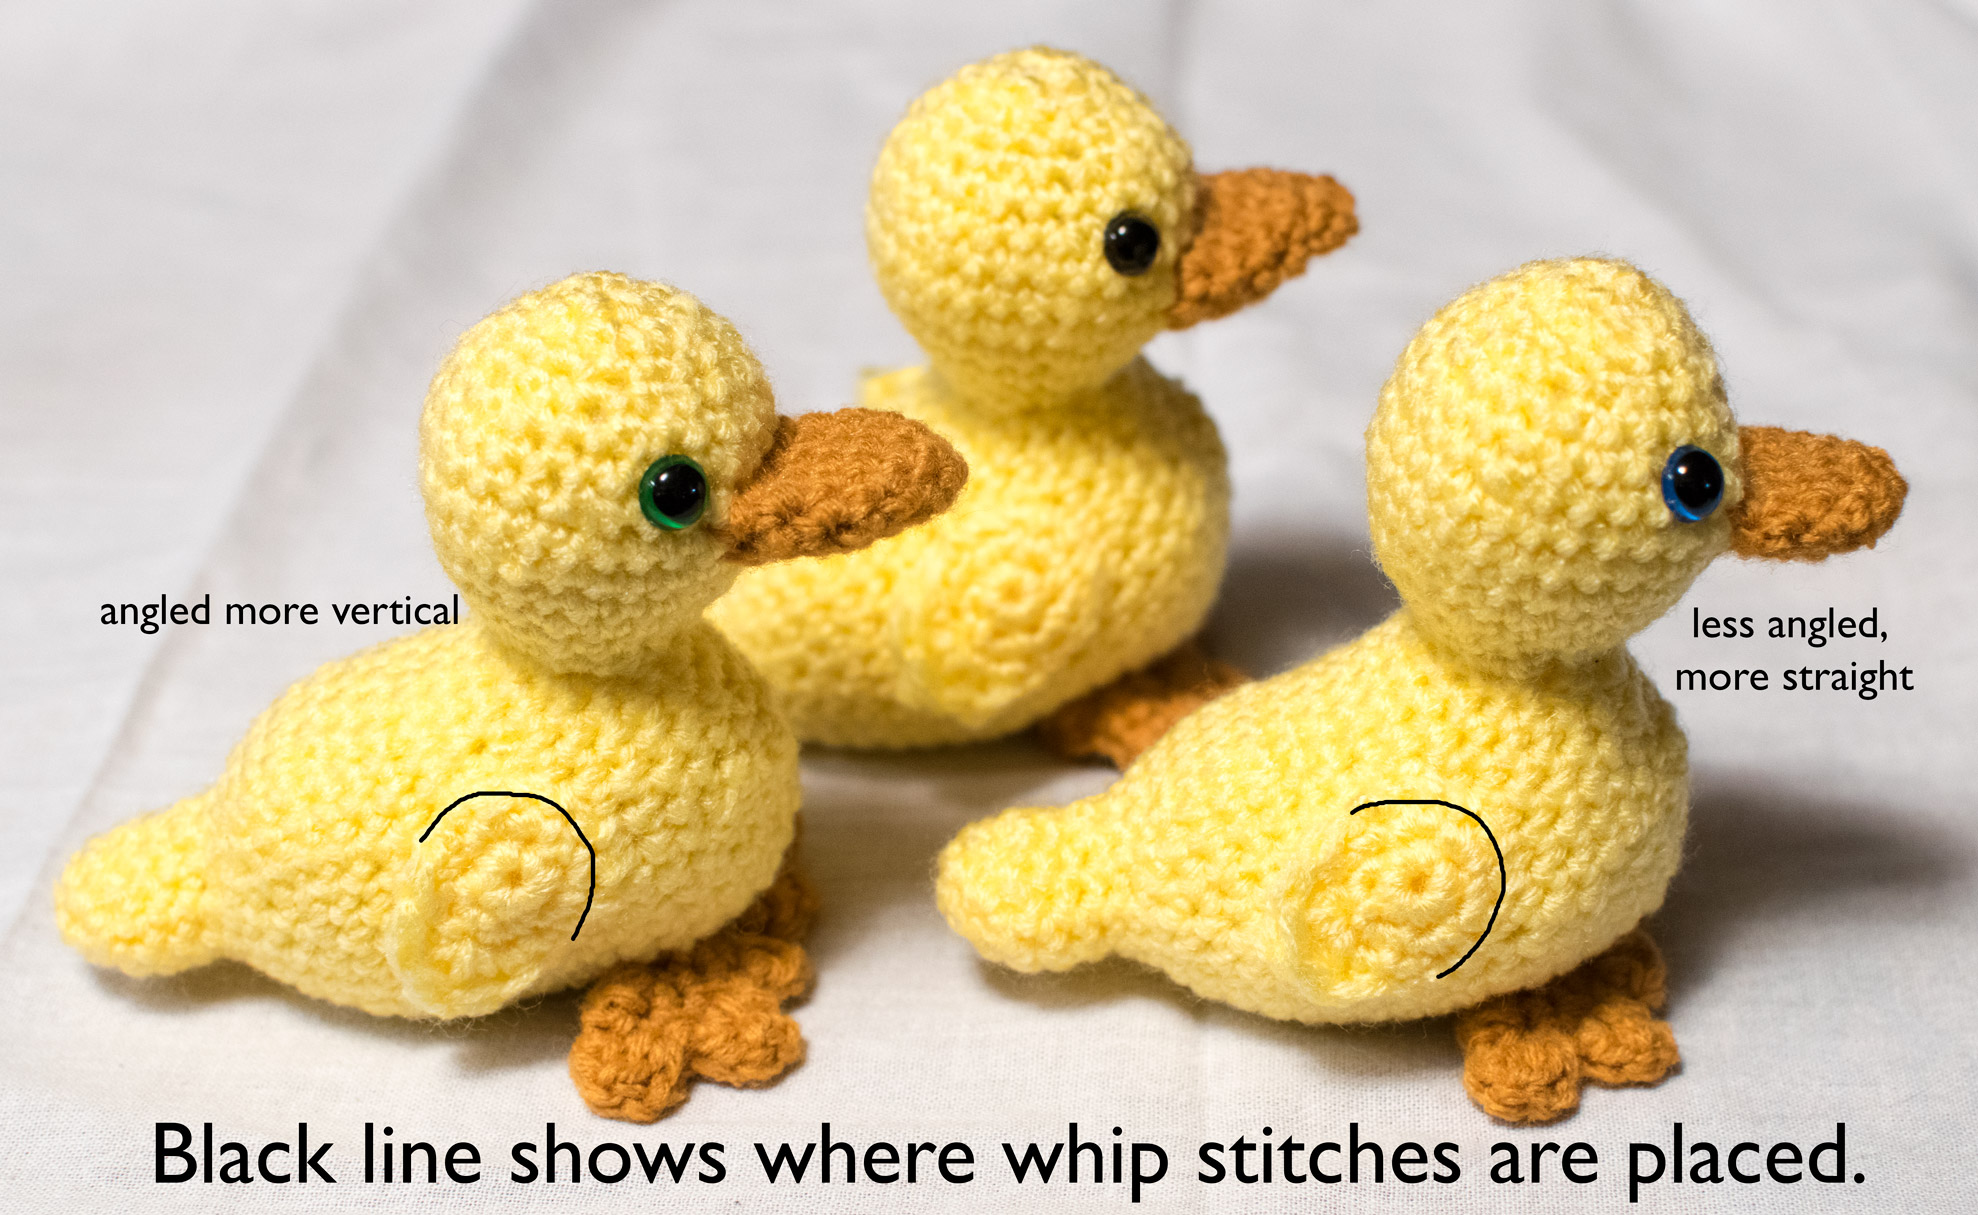
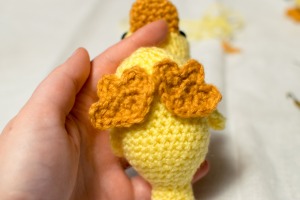
*To place the wings, you will want to place them approximately 3 stitches down from the base of the neck. How you want them sewn on is up to you though! You can choose to have them lay angled, or have them go straight back. You will only be sewing HALF of the wing to the body. Whip stitch around, starting from your inv ss to the sc before your hdc. weave in end.
Feet (make 2):
1: ch 2, 2 sc in 2nd ch from hook. ch 1 turn.
2: inc in both stitches. ch 1, turn.
3: inc in first stitch, sc in next 2, inc in last, ch 2 turn.
4: dc in first stitch. in next stitch hdc, ss. ss into next stitch (beginning second toe), [ch2, dc in same stitch. hdc, ss in next. ss into next stitch.]*2 times.
5: working around the back of the foot. sc 6. FO with invisible ss.
*To attach the feet, sew through the middle back (this would be the area where your starting ch 2 is!), securing the backs to the bottom but having the little toes stick out. you’ll want the back of the foot lined up to about one row behind the neck.
Duck bill:
1: Start with a mr. 3 sc inside the ring. (3)
2: inc in each stitch. (6)
3: Inc in each stitch. (12)
4-6: sc in each stitch around. FO with an inv slip stitch.
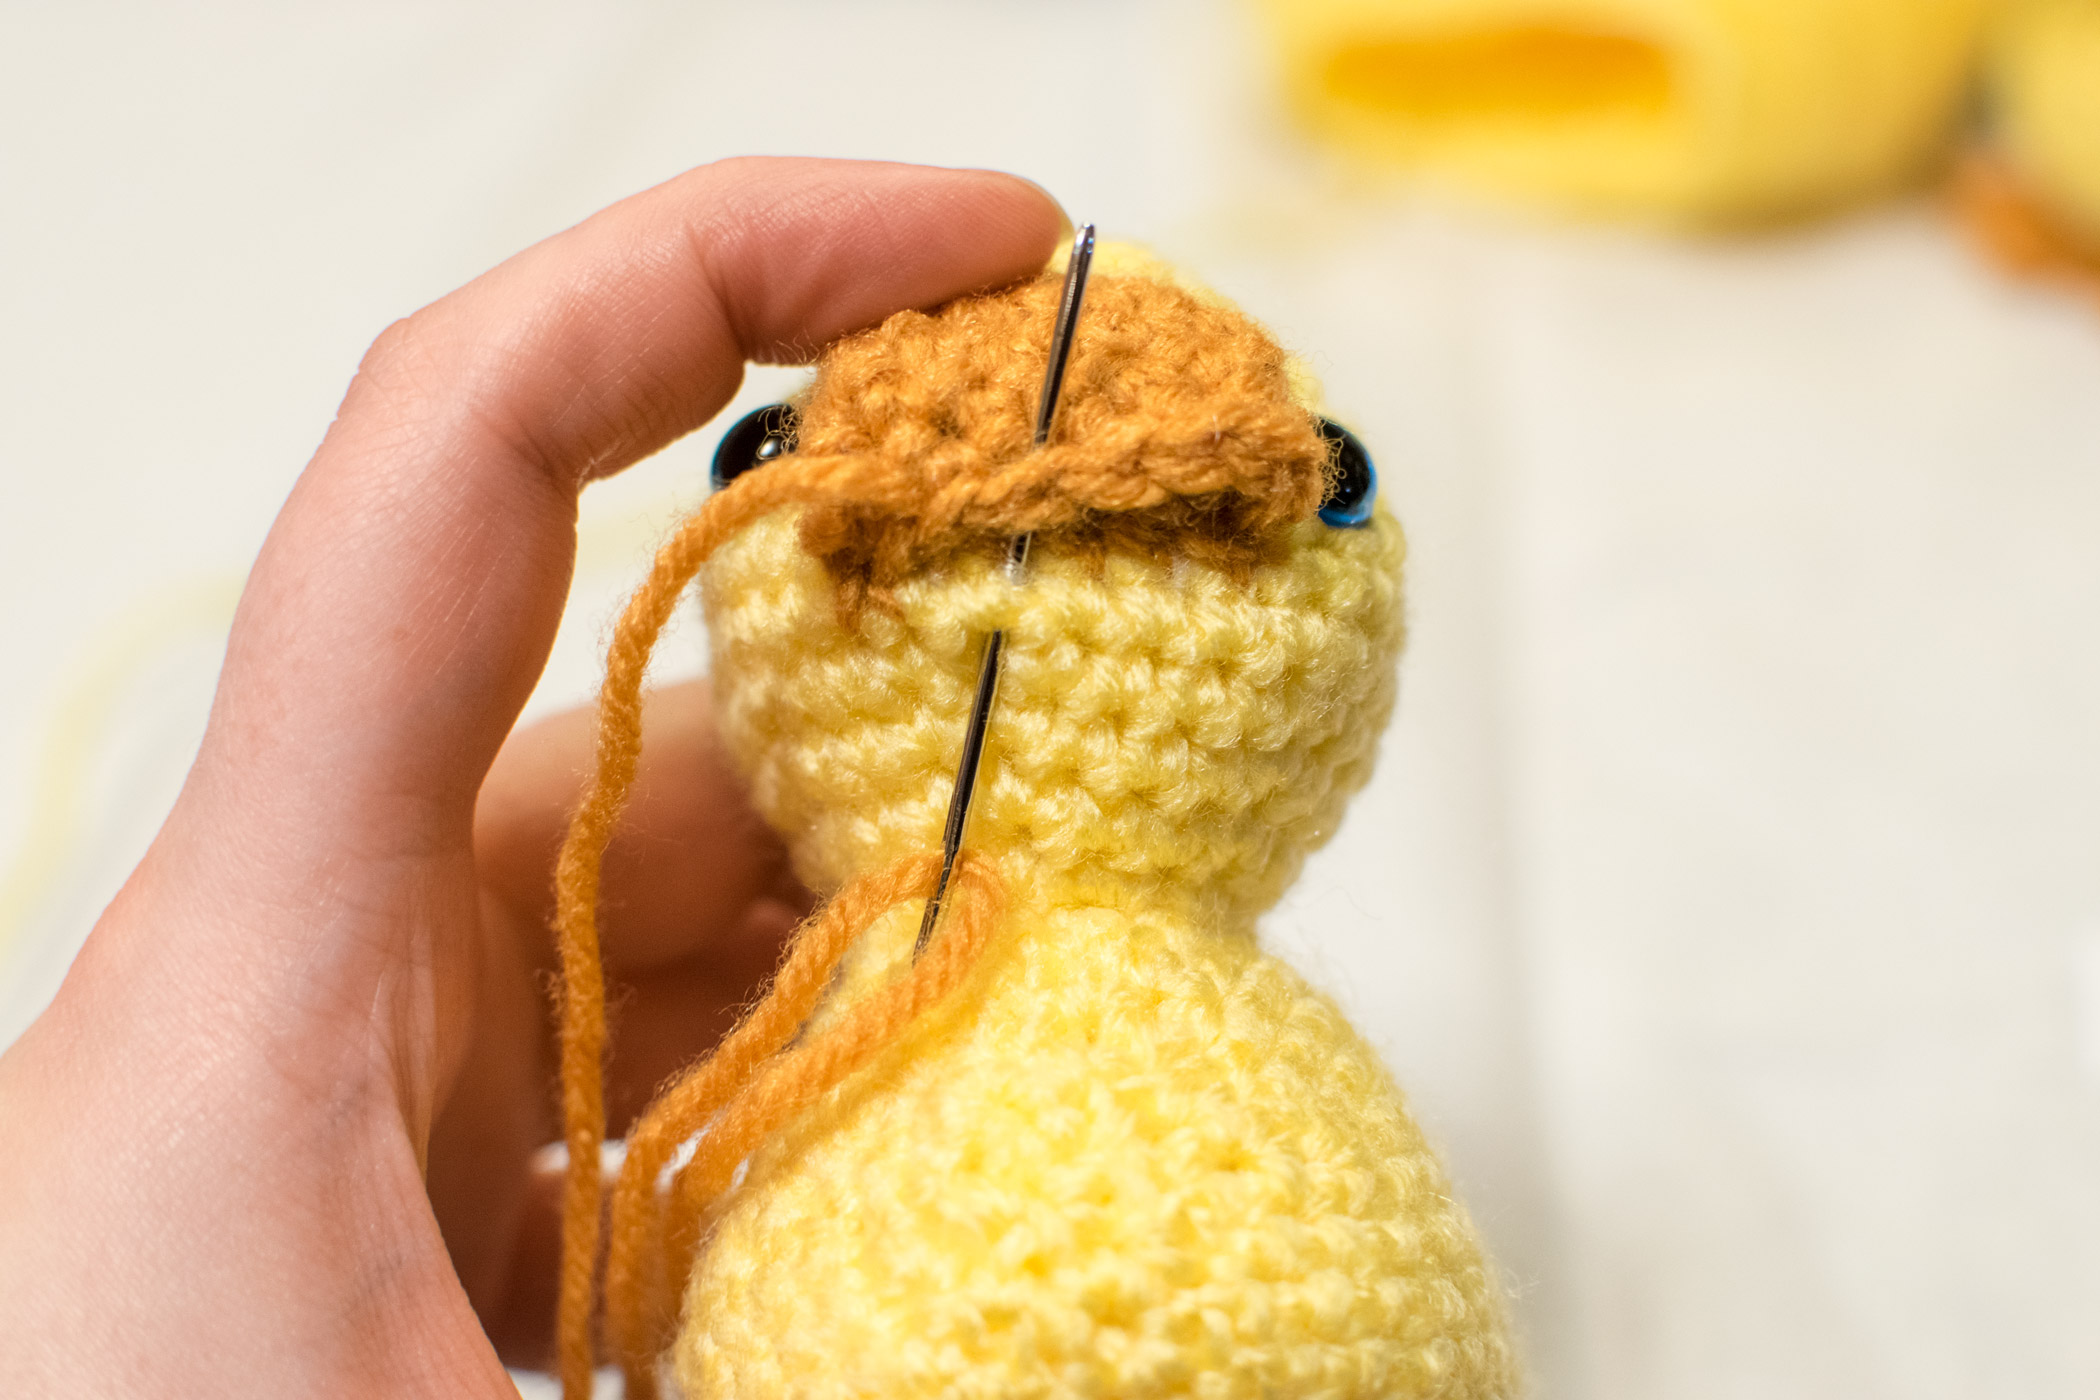
*To attach bill, line it up between the eyes. If you left 6 stitches, it should be very easy to keep this centered. With the bill flattened, whip stitch all around the bill. Weave in the end.
And that’s it! Your own little Waffles the duck is complete. 🙂

If you make this, tag it with #IjustWannaBeKnotty #WafflesTheDuck on Instagram or facebook. Or directly tag me at @IJustWannaBeKnotty …I’d love to check out your finished projects!
You are absolutely welcome to sell anything you create from this pattern. You bought the yarn, and spent your time making it, so you are free to do with your finished “Waffles” whatever your heart desires. Just please give me credit for the design.
If you want to share this pattern with a friend, please link back to my blog post. Do not copy or redistribute this pattern in any way.
Lastly, but most importantly, please do not claim this pattern and/or the photos as your own. I spend a lot of time on them, and I would hate to see someone else take credit when they didn’t do the work.
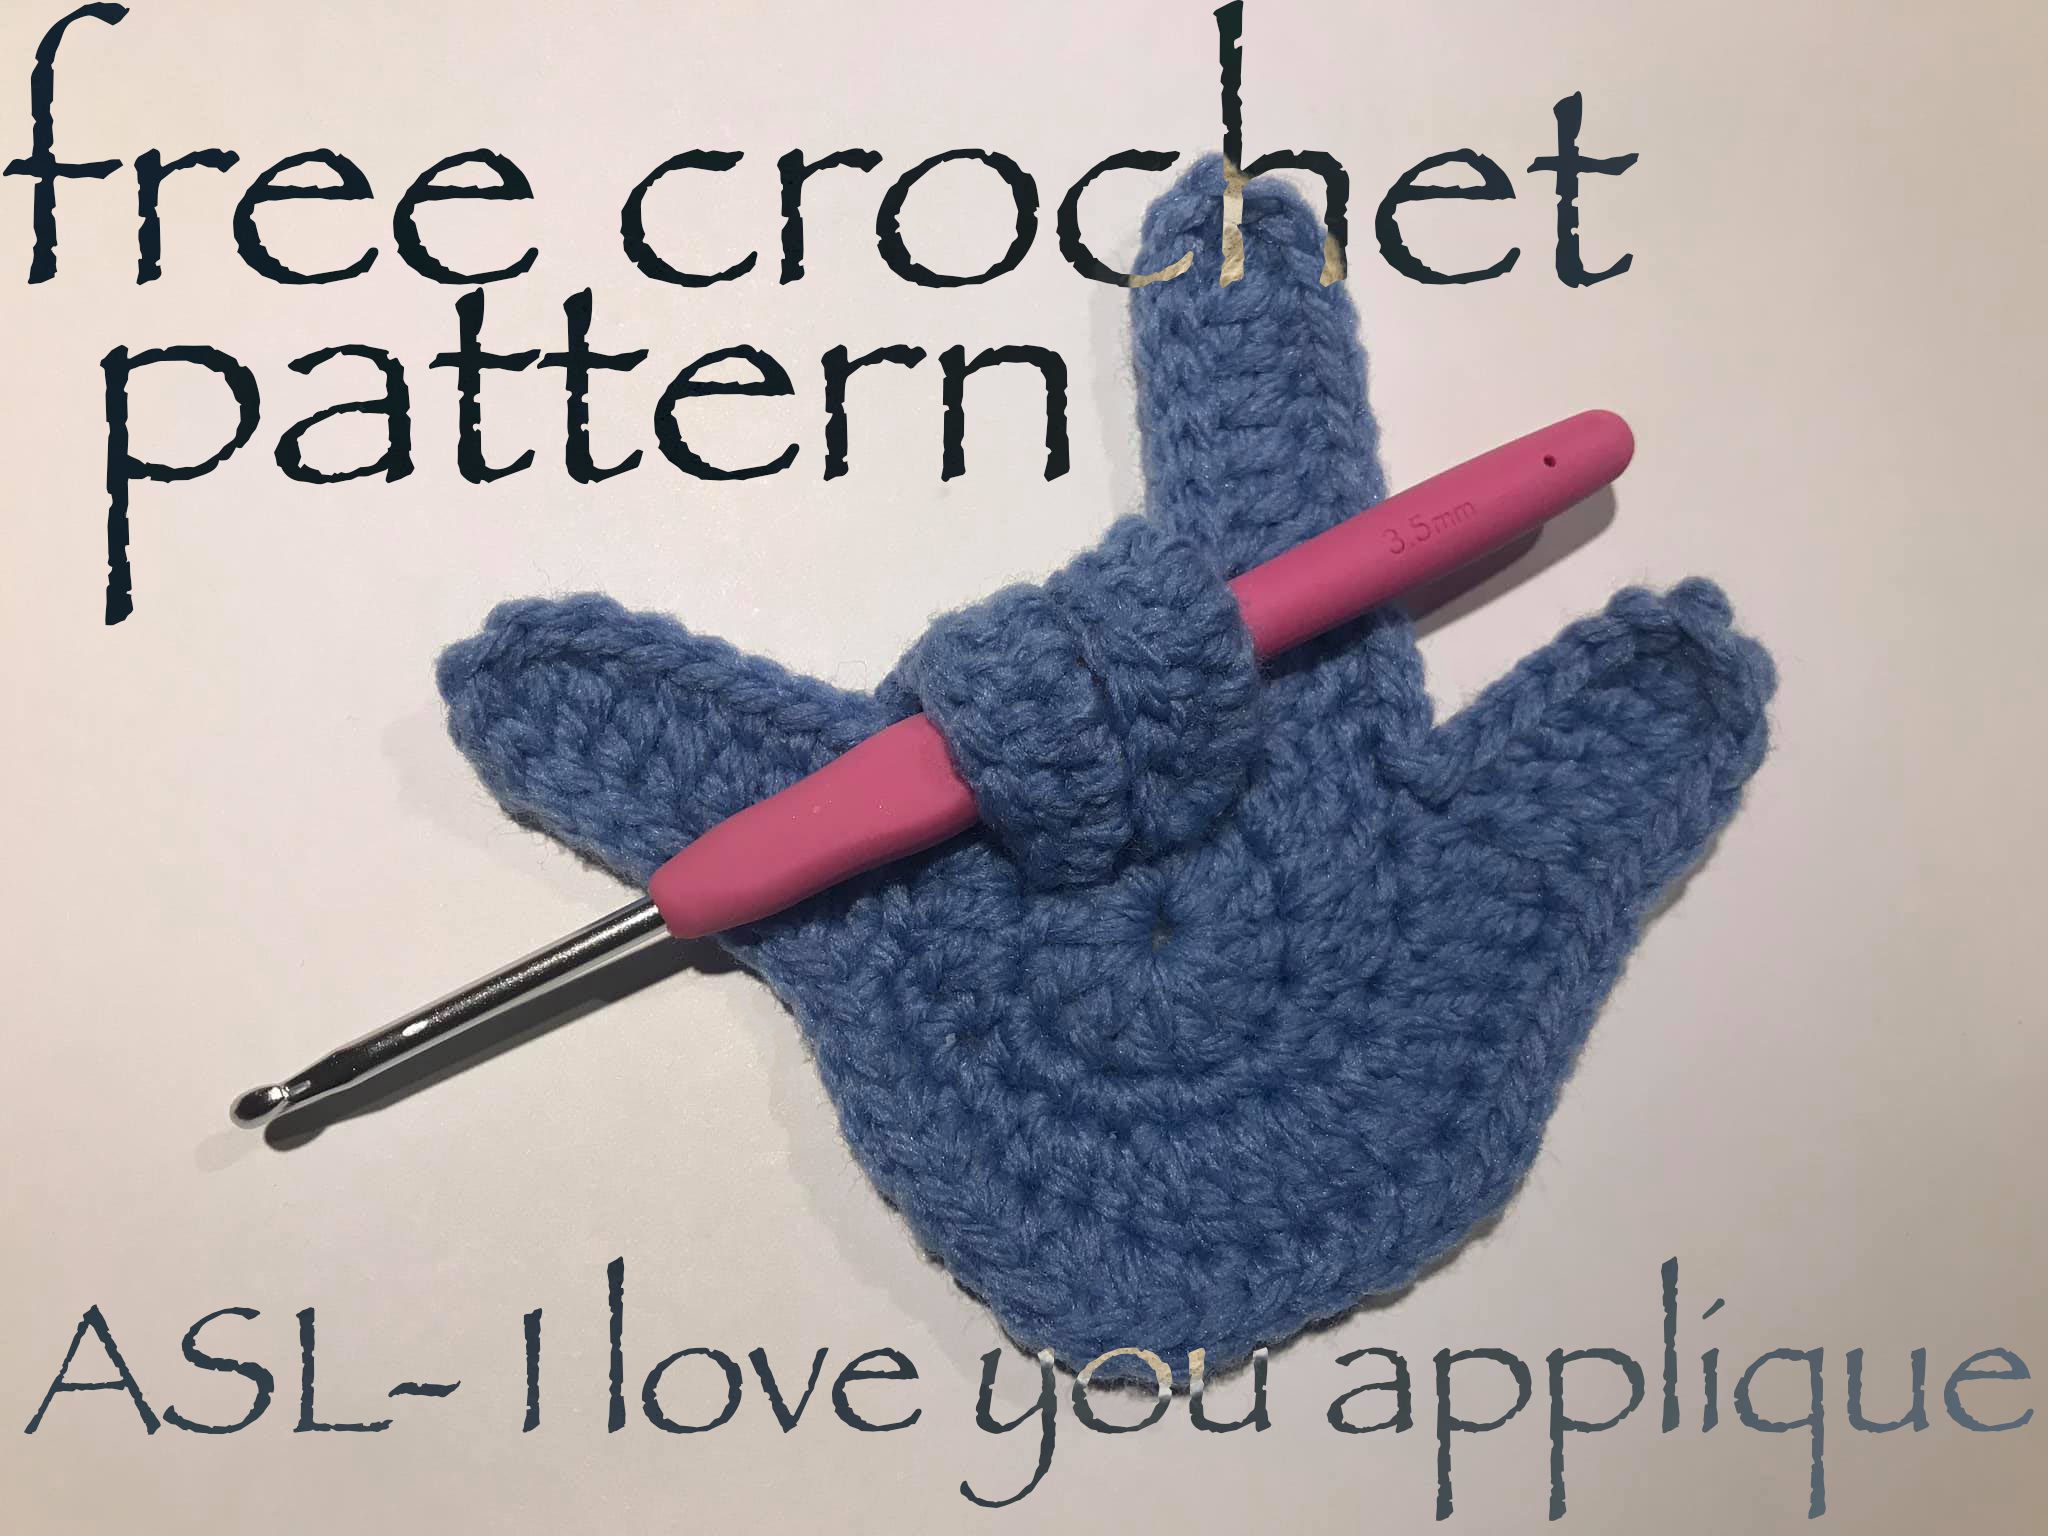
Growing up with deaf parents and around the deaf community, ASL has been a huge part of my life. Though, personally, I am hearing.
When a deaf friend posted a request for an “I love you” hand, I went looking for a pattern. I was shocked to see that there wasn’t one! At least not one that I could easily find. So, I decided I would wing it and see what I could do. This is what I came up with!
The attempt got so many requests for a pattern, and unfortunately, I hadn’t written anything down. So, I decided to figure out how I made it, and with a little luck, I was able to!
Due to responses on my design, I would absolutely LOVE to monetize it and make a profit. But, I feel this is something that should be available to everyone. I definitely know the struggle of finding a pattern I’d love to make, and not having it within my budget to purchase…and I also think this is a good way to bring more awareness to the deaf community, but through the art of crochet.
However, if you would like to throw some pennies at the artist (I hear she’s really awesome! lol), you may do so HERE but it is absolutely not required to be able to make this! 🙂
So, enough rambling, let’s talk about this pattern…
It’s all done in one go, there is zero cutting or attaching anything…Which is great because, that means there’s hardly any ends to weave in when you’re done! YAY!
This can be done in any yarn you want. I’ve personally tried worsted and nylon crochet thread. Both worked out perfect.
You can also use whatever hook you’d like. Need a bigger hand? Use a larger hook. Need it smaller? You guessed it, use a smaller hook.
This is made flat, so it can be added to projects like scarves, blankets, stuffed animals and handbags, or used as a standalone item for ornaments, keychains and whatever else your little creative brain can come up with!
This pattern could be considered tricky to follow; but, I’m going to try and explain it as easily as I can, including photos. I would love to see everyone be able to create this pattern!!
What you’ll need:
Yarn – any kind you want, not sure on exact yardage but it’s not very much!
Crochet hook – any size
Tapestry needle – for weaving ends
Stitch abbreviations:
MR – Magic ring
SS – Slip stitch
SK – Skip next stitch
CH – Chain
HDC – Half double crochet
DC – Double crochet
TRC – Treble crochet
SPECIAL NOTES ABOUT THIS PATTERN – PLEASE READ BEFORE STARTING!
Stitches in [brackets] means to repeat the amount indicated
This pattern is worked continuously around. You will not turn at any point.
This contains MANY slip stitches. Make sure to do them loosely, or your hand will end up a little wonky and hard to work with.
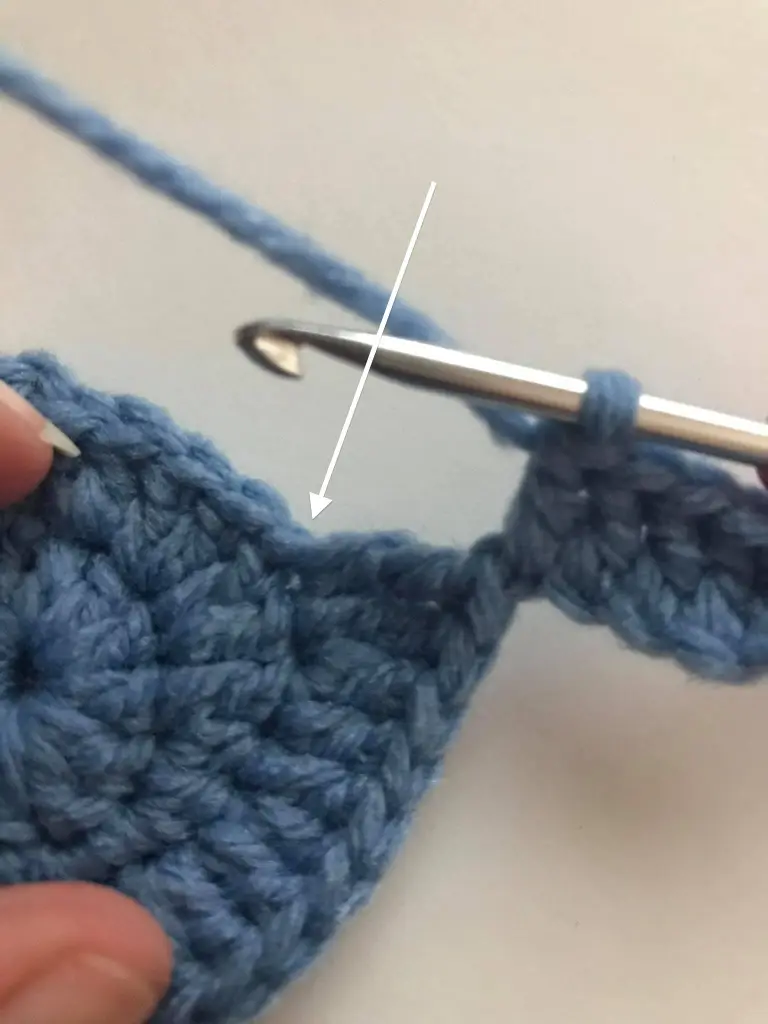
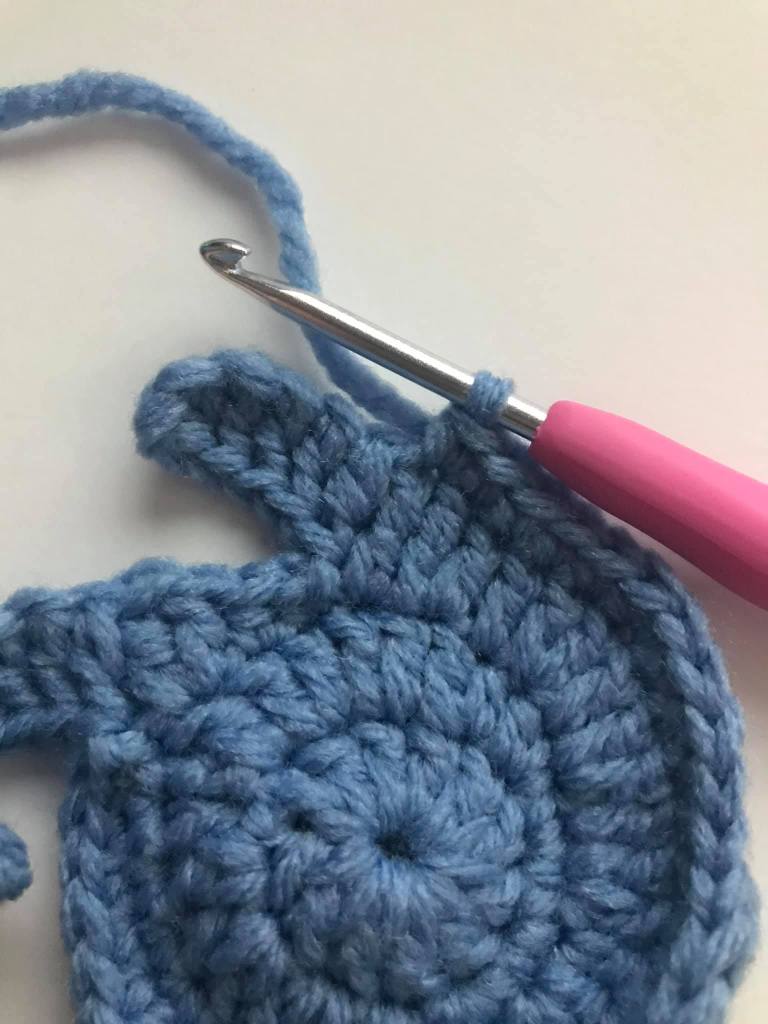
If you see a “+” after a step, it means theres a photo because I thought it might confuse some people. So, please take a look at the picture below to make sure you’re working in the correct spot! 🙂
Row 1: Leave a semi long starting tail. MR, CH 2. DC 11 in ring. SS to top of CH 2.
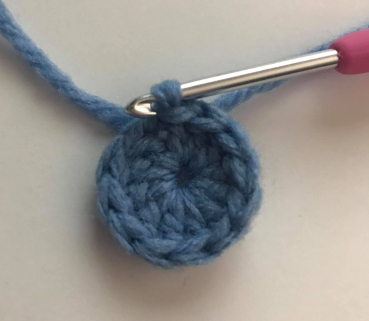
Row 2: CH 2. [In the next stitch 2 DC]*3. In the next stitch DC, HDC. In next stitch HDC, SC. [In next stitch 2 SC]*2. In next stitch SC, HDC. In next stitch HDC, DC. [In next stitch 2 DC]*2. DC right next to your starting chain+. SS to top of first DC.


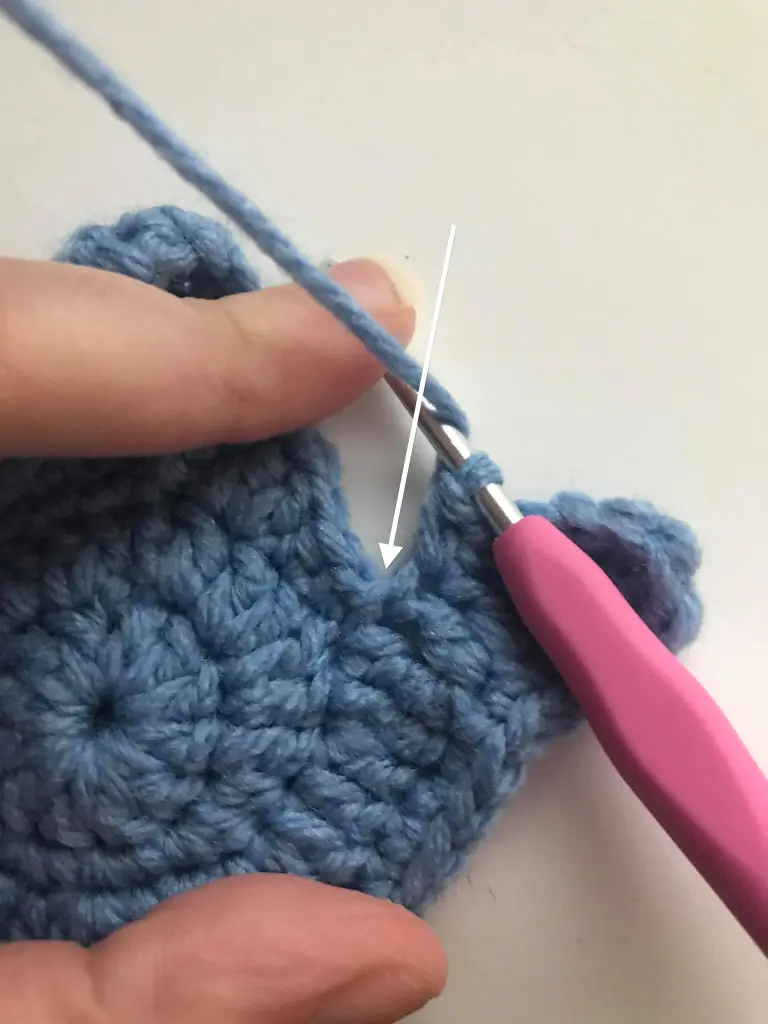
Row 3: CH 1, [SC in next]*5, CH 8. Working on the chain – HDC in 2nd CH from hook. [DC in next]*7. For the last DC stitch you will insert your hook using the front loop of your last SC before the CH and through the left front part of the SC. It’s a little awkward to explain, so please look at the photo!


SK next stitch, SS, SC, 2 SC, SC, 2 HDC, HDC, [2 DC in next stitch, DC in next stitch]*3. In next stitch DC, TRC. In next stitch TRC.
Starting the thumb – Ch 6. – working on the chain HDC in 2nd ch from hook. [DC in next stitch]*4. SS in the same stitch as the last TRC. SC, HDC, 2 DC.
Starting the next finger – CH 9. Working on the chain, HDC in 2nd CH from hook. [DC in next stitch]*7. SS to next stitch in previous row. [SC in next]*6.
First stitch is a little tricky to find+, last SC should fall right at the finger.+


Working around the finger – [SC in next]*7, [SS in next]*6, [SC in next]*5, [HDC in next]*4, DC, 2 DC, HDC, [SC in next]*4, 2 SC, [SC in next]*5 (Last SC should fall on the 2nd TRC)
Working on the thumb – [SC in next]*11, SS in the stitch where the last DC of your thumb meets the hand.+ SS in next. [SC in next]*12, [SS in next]*8, SC.
Beginning first folded finger – CH 8, HDC in 2nd CH from hook. [DC in next]*6, SK, SS.
Beginning second folded finger – CH 7, HDC in 2nd CH from hook. [DC in next]*5, SK, SS. Fasten off.
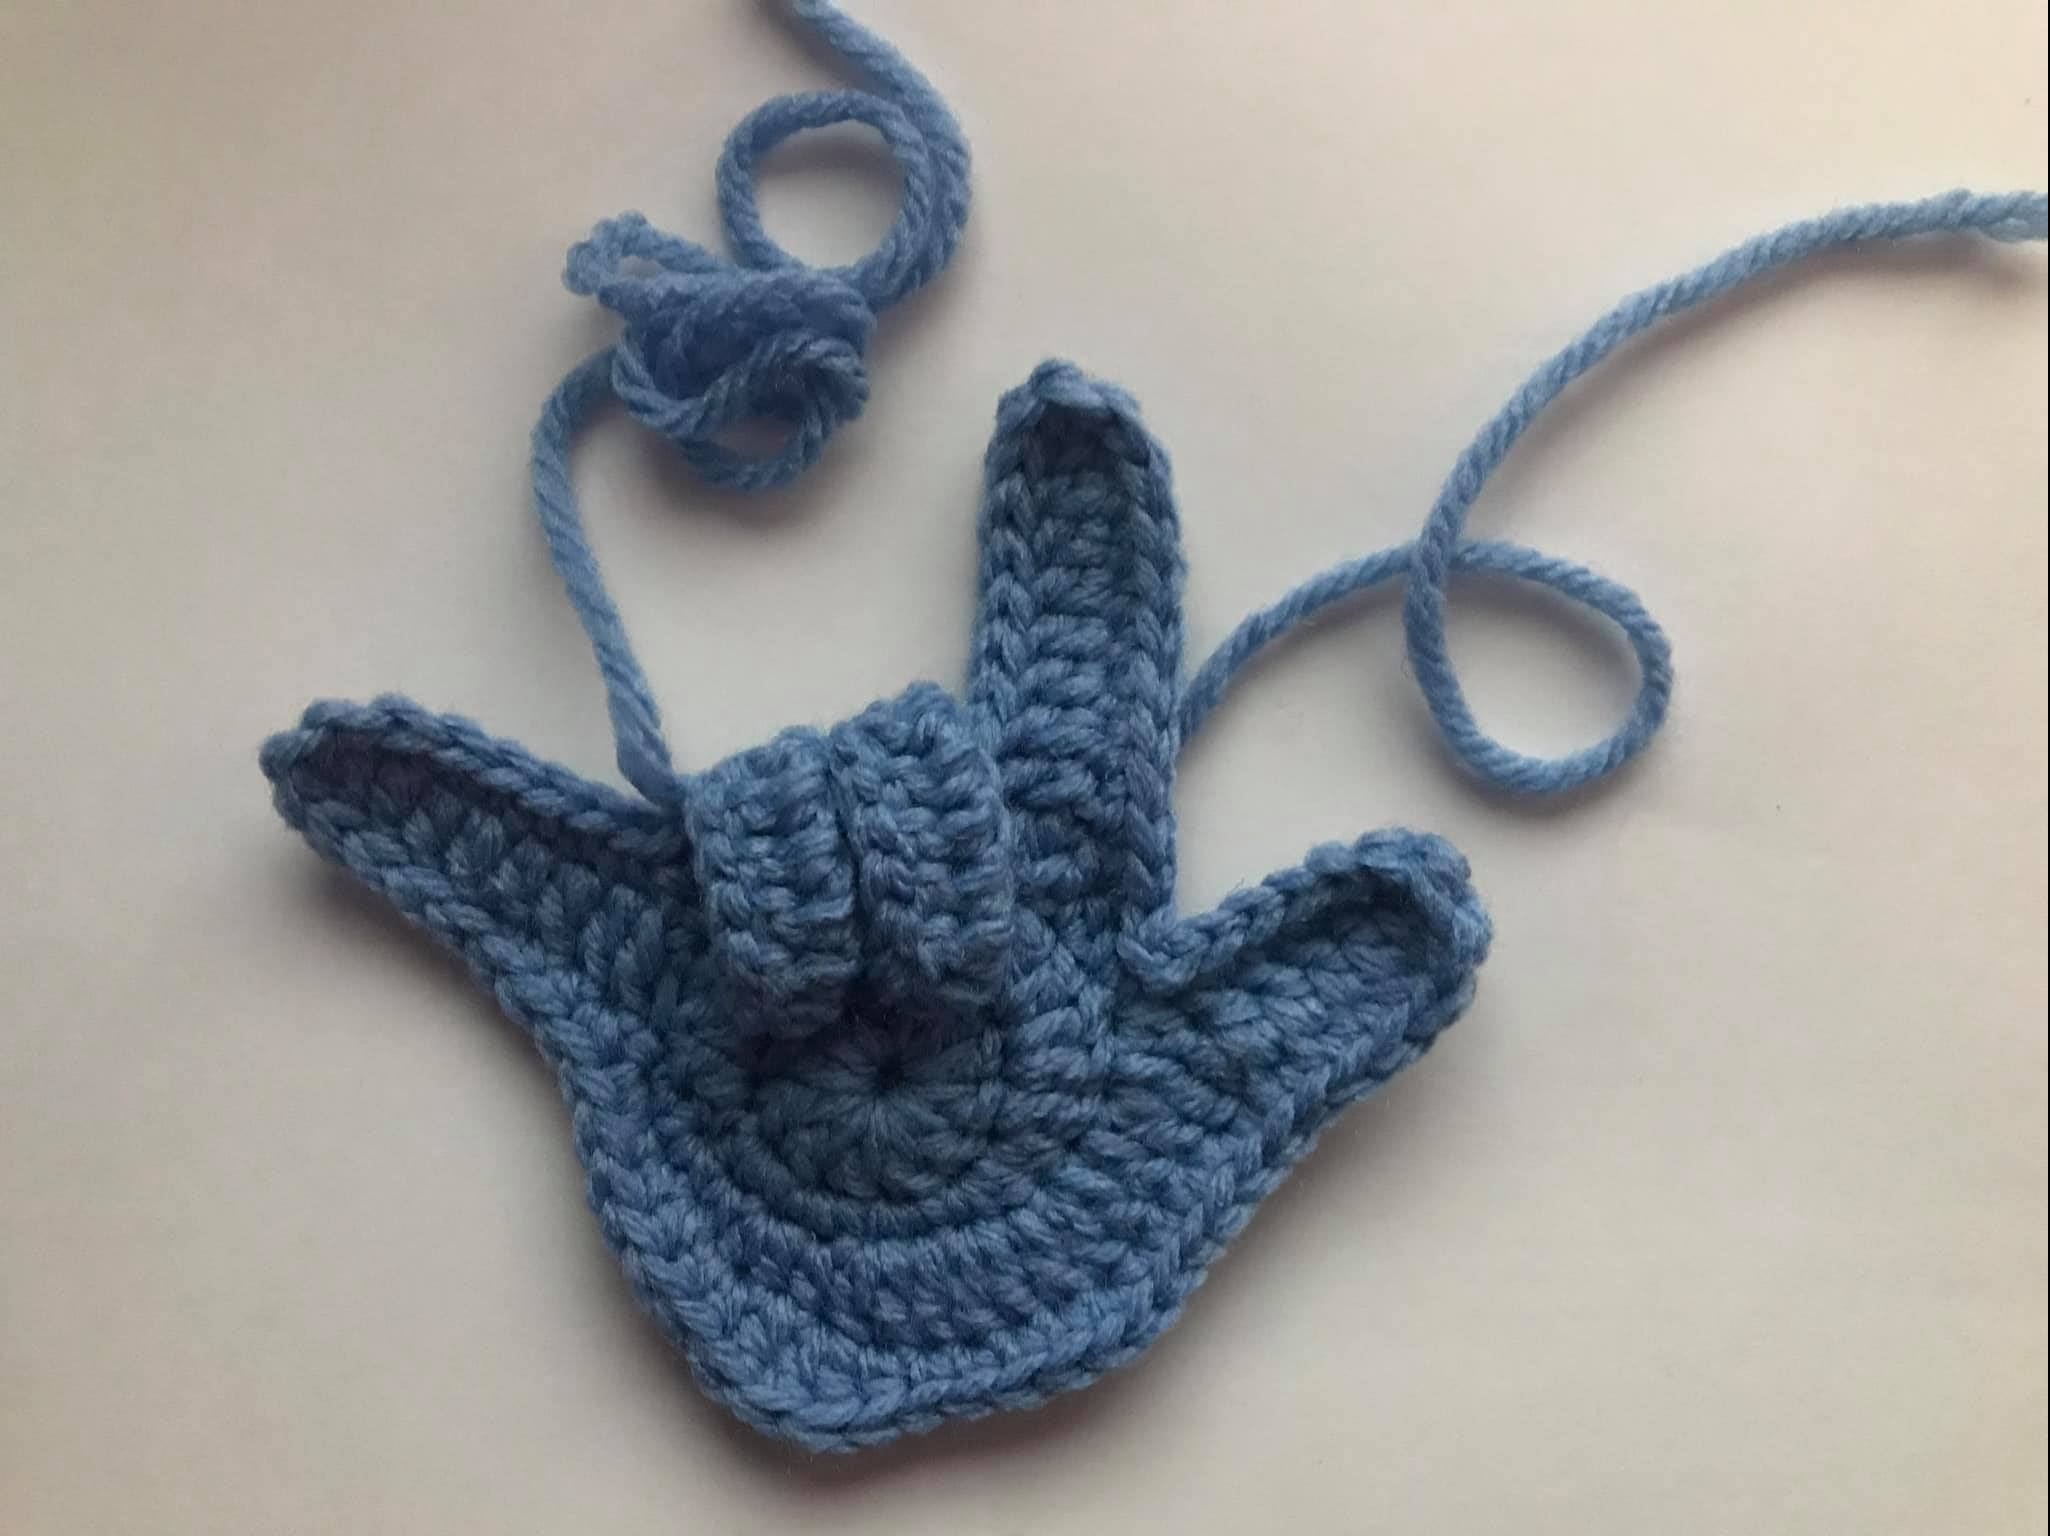
Use your starting tail to secure the fingers. If you only go through the tips, you can totally use this to hold things. (Think, candy canes! pencils! crochet hooks!) Then weave in the ends.


Now you are finished! 🙂
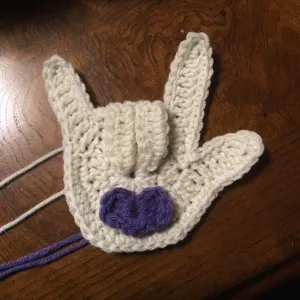
If you would like to add a heart, there’s a great pattern that gives you different size options that you can follow here!
Hope this wasn’t too difficult to follow! If you get stuck, see a mistake, or just have any questions in general, feel free to leave me a comment! I will get back to you as soon as I can. 🙂
Now go on, spread the love! ❤


*Photos are property of Bobbie Wojton, aka, I Just Wanna Be Knotty. Please do not share them as your own, or on any other platform for your own personal benefit.
*You may sell anything you make from using this pattern, but please properly credit me as the designer by linking back to this blog post.
*This pattern may NOT be posted in partial or full on any other site, without proper written consent from me. If you would like to keep a personal copy, you are fully welcome to. But, if shared on a social platform, please do so by linking to this post.
While watching the Walking Dead the other night, I started making an ear warmer. Well, somewhere along the way, I got side tracked and ended up with a slouchy hat. Many have asked for the pattern, so I figure I’ll go ahead and share my happy little accident. 🙂
This hat is super easy and worked from the bottom up, starting with the band. It can be customized to fit any head.
THIS HAT NEEDS A NAME! If you have an idea, let me know. 🙂
I apologize in advance. I do not have any progress photos. Only completed. This was kind of a last minute write up, as I didn’t want to forget to do it. If you catch any mistakes, or have questions, leave a comment and I’ll get back to you as soon as I see it!
So, without further ado…
Things you’ll need:
5.5 mm hook
Any color worsted weight yarn
Tapestry needle
Ruler for measuring length
Stitch Abbreviations:
CH – Chain
SC – Single crochet
BLO – Back loop only
SS – Slip stitch
DCBLO – Double crochet back loop only
FPTC – Front post treble crochet
Row 1: Make a CH 9, SC in 2nd CH from hook, and in each CH across. CH 1, turn. (8)
Row 2: SC in 1st stitch, SC in BLO in next 6, SC in last stitch. CH 1, turn. (8)
Row 3: Repeat row 2 until band reaches desired length, making sure your last row ends on the opposite side of your starting tail.
Child size – approximately 19″
Small adult – approximately 20″
Medium/large adult- approximately 21″
Fold the band in half creating a circle. SS across the band using the BLO on your ending row. If you ended correctly, your starting tail should be where we will start the top of the hat. Flip the band inside out, so that you are now working on the opposite side.
Row 4: CH 1, SC in each end stitch on your band, working over the beginning tail. Join with a SS to first SC. DO NOT TURN. (Number of SC will vary depending on how many rows you made)
Row 5: CH 2, DCBLO in each stitch around. Join with a SS to first DCBLO.
Row 6: CH 2, *[FPTC around post of first DC, DC in next] *Repeat around. Join with a SS in the top of the first FPTC (Your last completed stitch should be a FPTC)
Row 7: CH 2, *[FPTC around post of FPTC from previous row, DC in next] *Repeat around. SS to first FPTC.
Row 8: Repeat row 7 until you’ve reached your desired length.
(The more rows you add, the more slouch your hat will have)
For a child’s hat, total length from bottom of band to top of hat should be around 8″
For a medium/large adult hat, total length from bottom of band to the top of hat should be around 9″
Leave a long tail and use your tapestry needle to weave through all your stitches in the last row. Pull string tight to cinch it closed.
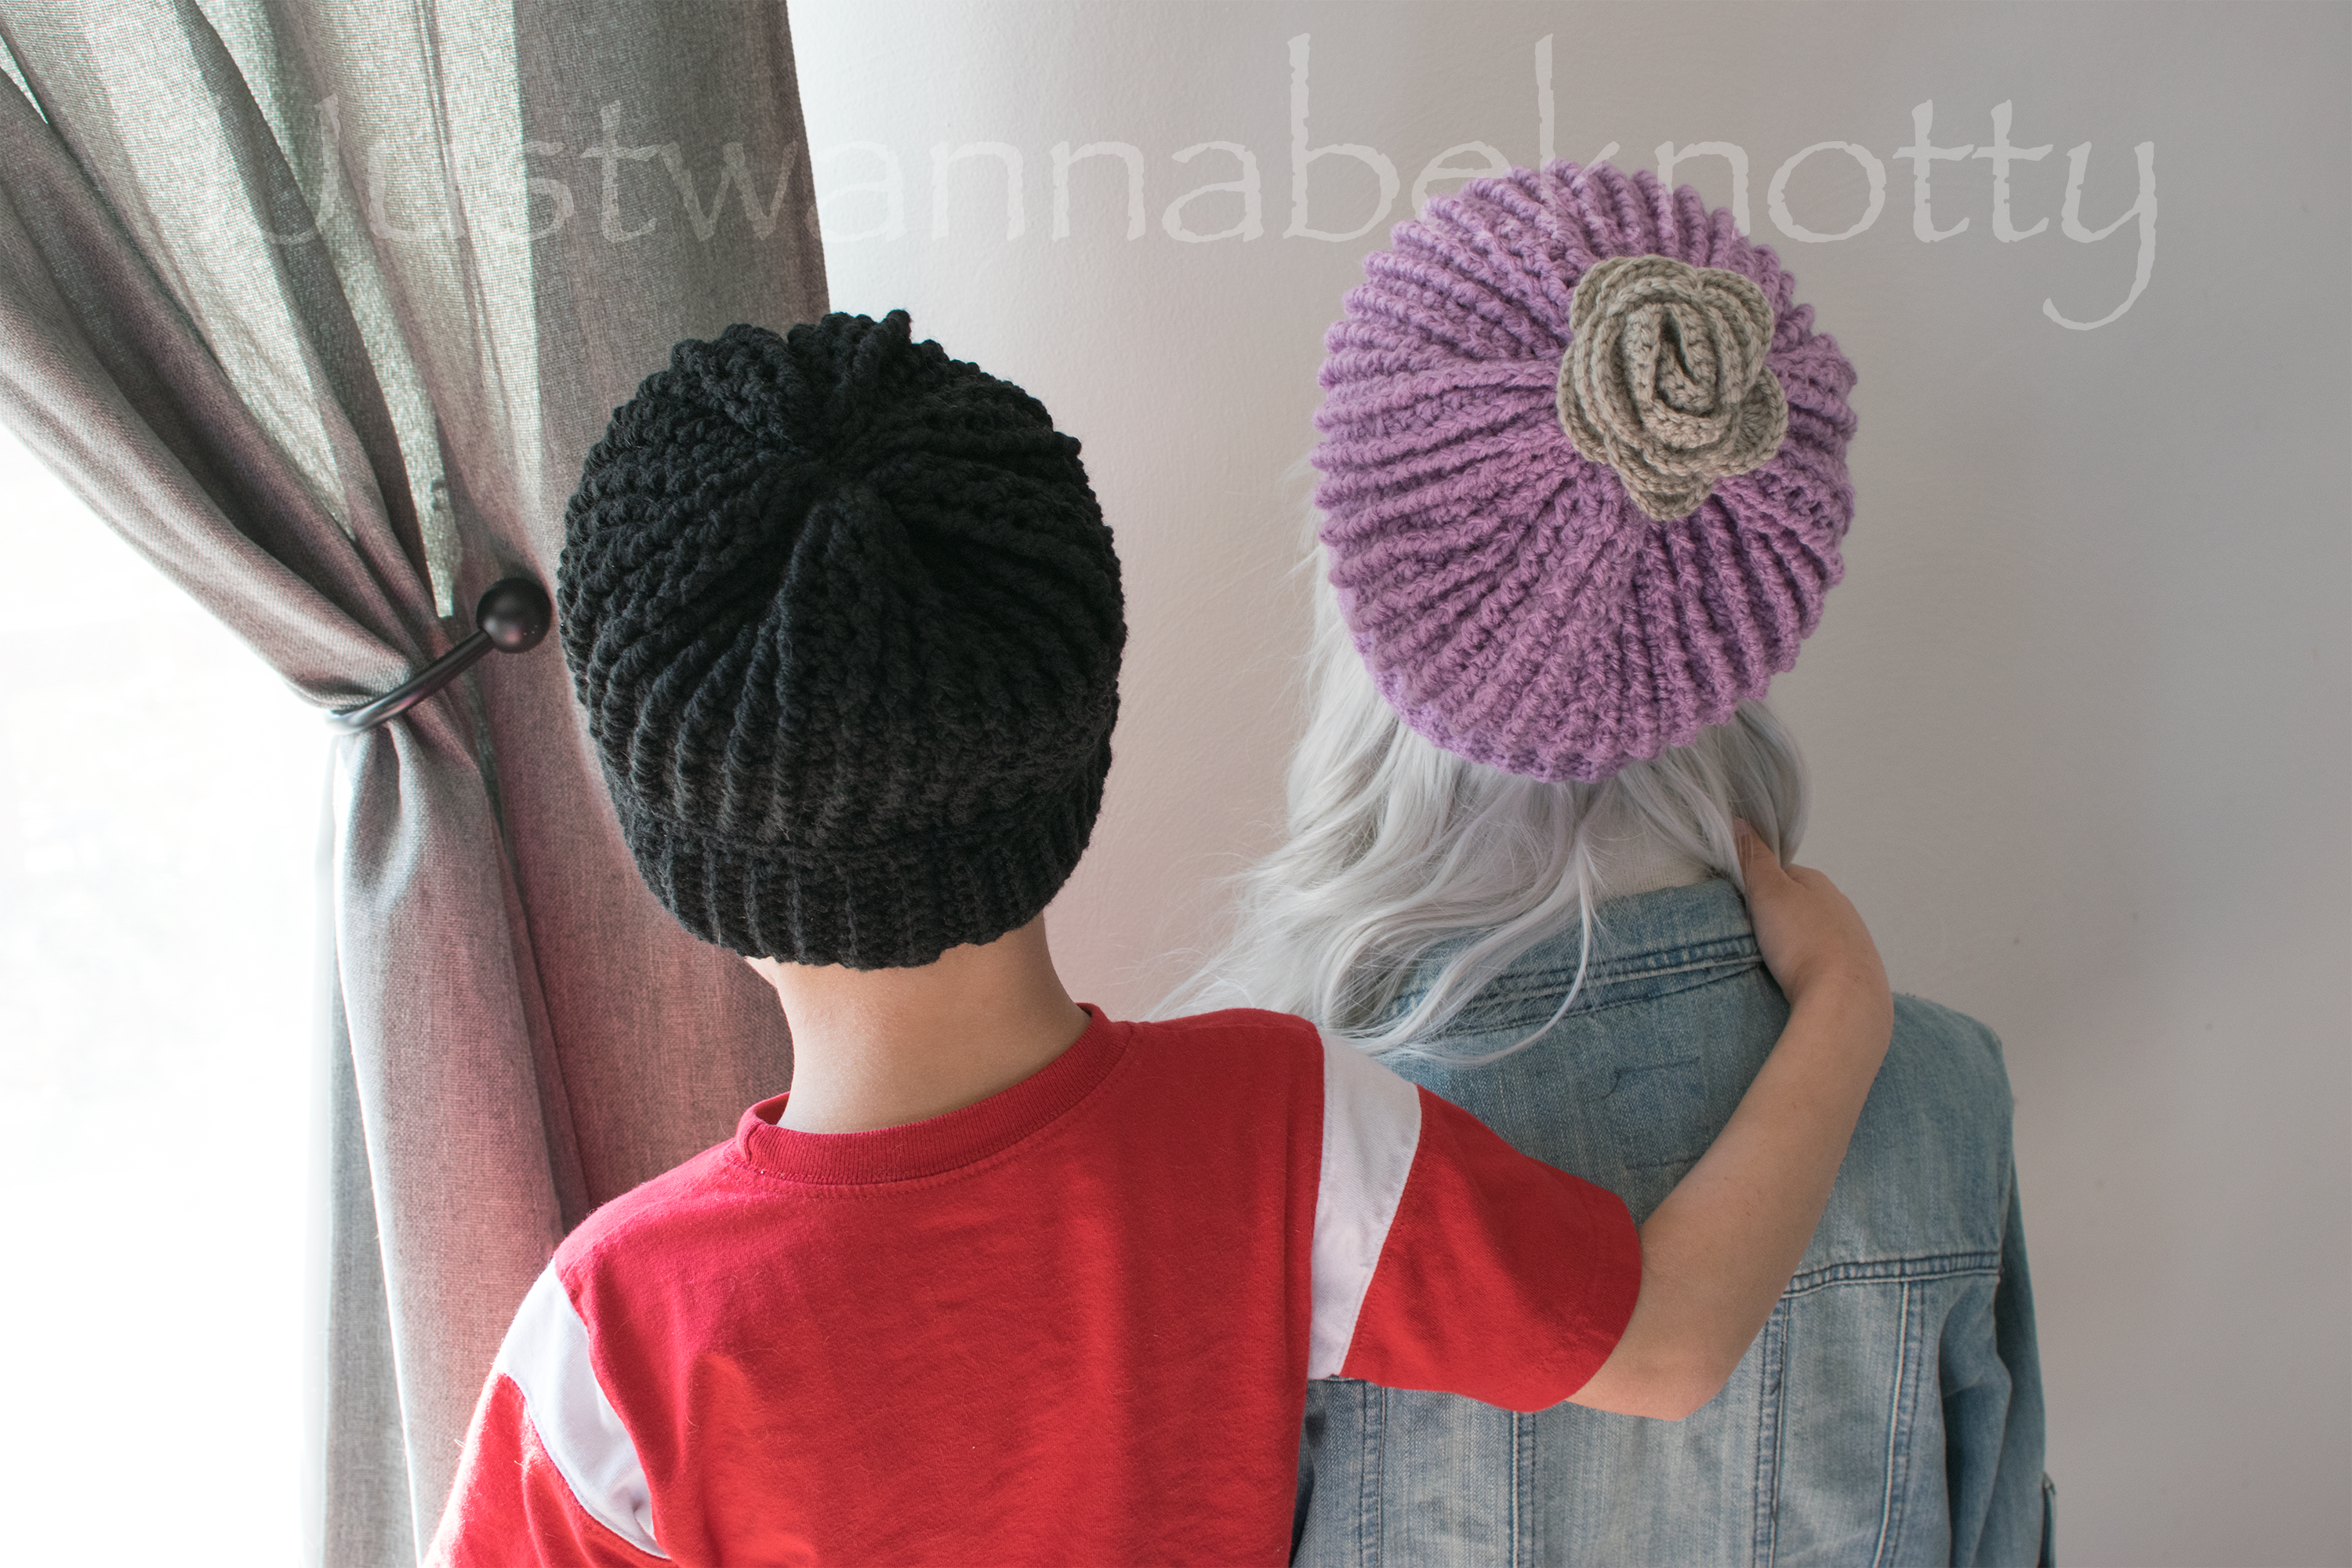
You will likely have a small hole at the top, this is an easy fix! when you pull tight, you can just use your tail to weave back and forth across the hole to pull it together. Or you can add a pom pom, or flower (Like I did!) Really, the possibilities are endless! You can even leave the hole, as some actually like the look…whatever tickles your fancy! 🙂
Hope you enjoy making this slouchy hat! It really is sooo fast to whip up, that you can make enough for a small army in no time. Happy hooking!!


———————————————————————————-
Pattern is for the hat only.
Any embellishments, or pom pom patterns are up to you to create and choose!
The rose is a free pattern I found HERE … So clicky clicky and follow their tutorial if you’d like a flowery hat like mine!
Photos are property of Bobbie Wojton, aka, IJustWannaBeKnotty, please do not use and share them as your own.
Any likeness or similarities to any other patterns is pure coincidence.
You are free to sell anything you create from this pattern. Go ahead with yo’ bad self, make that money! 🙂 Buuuuut, if you get rich off this pattern and are feeling generous, feel free to donate via the link on my blog.


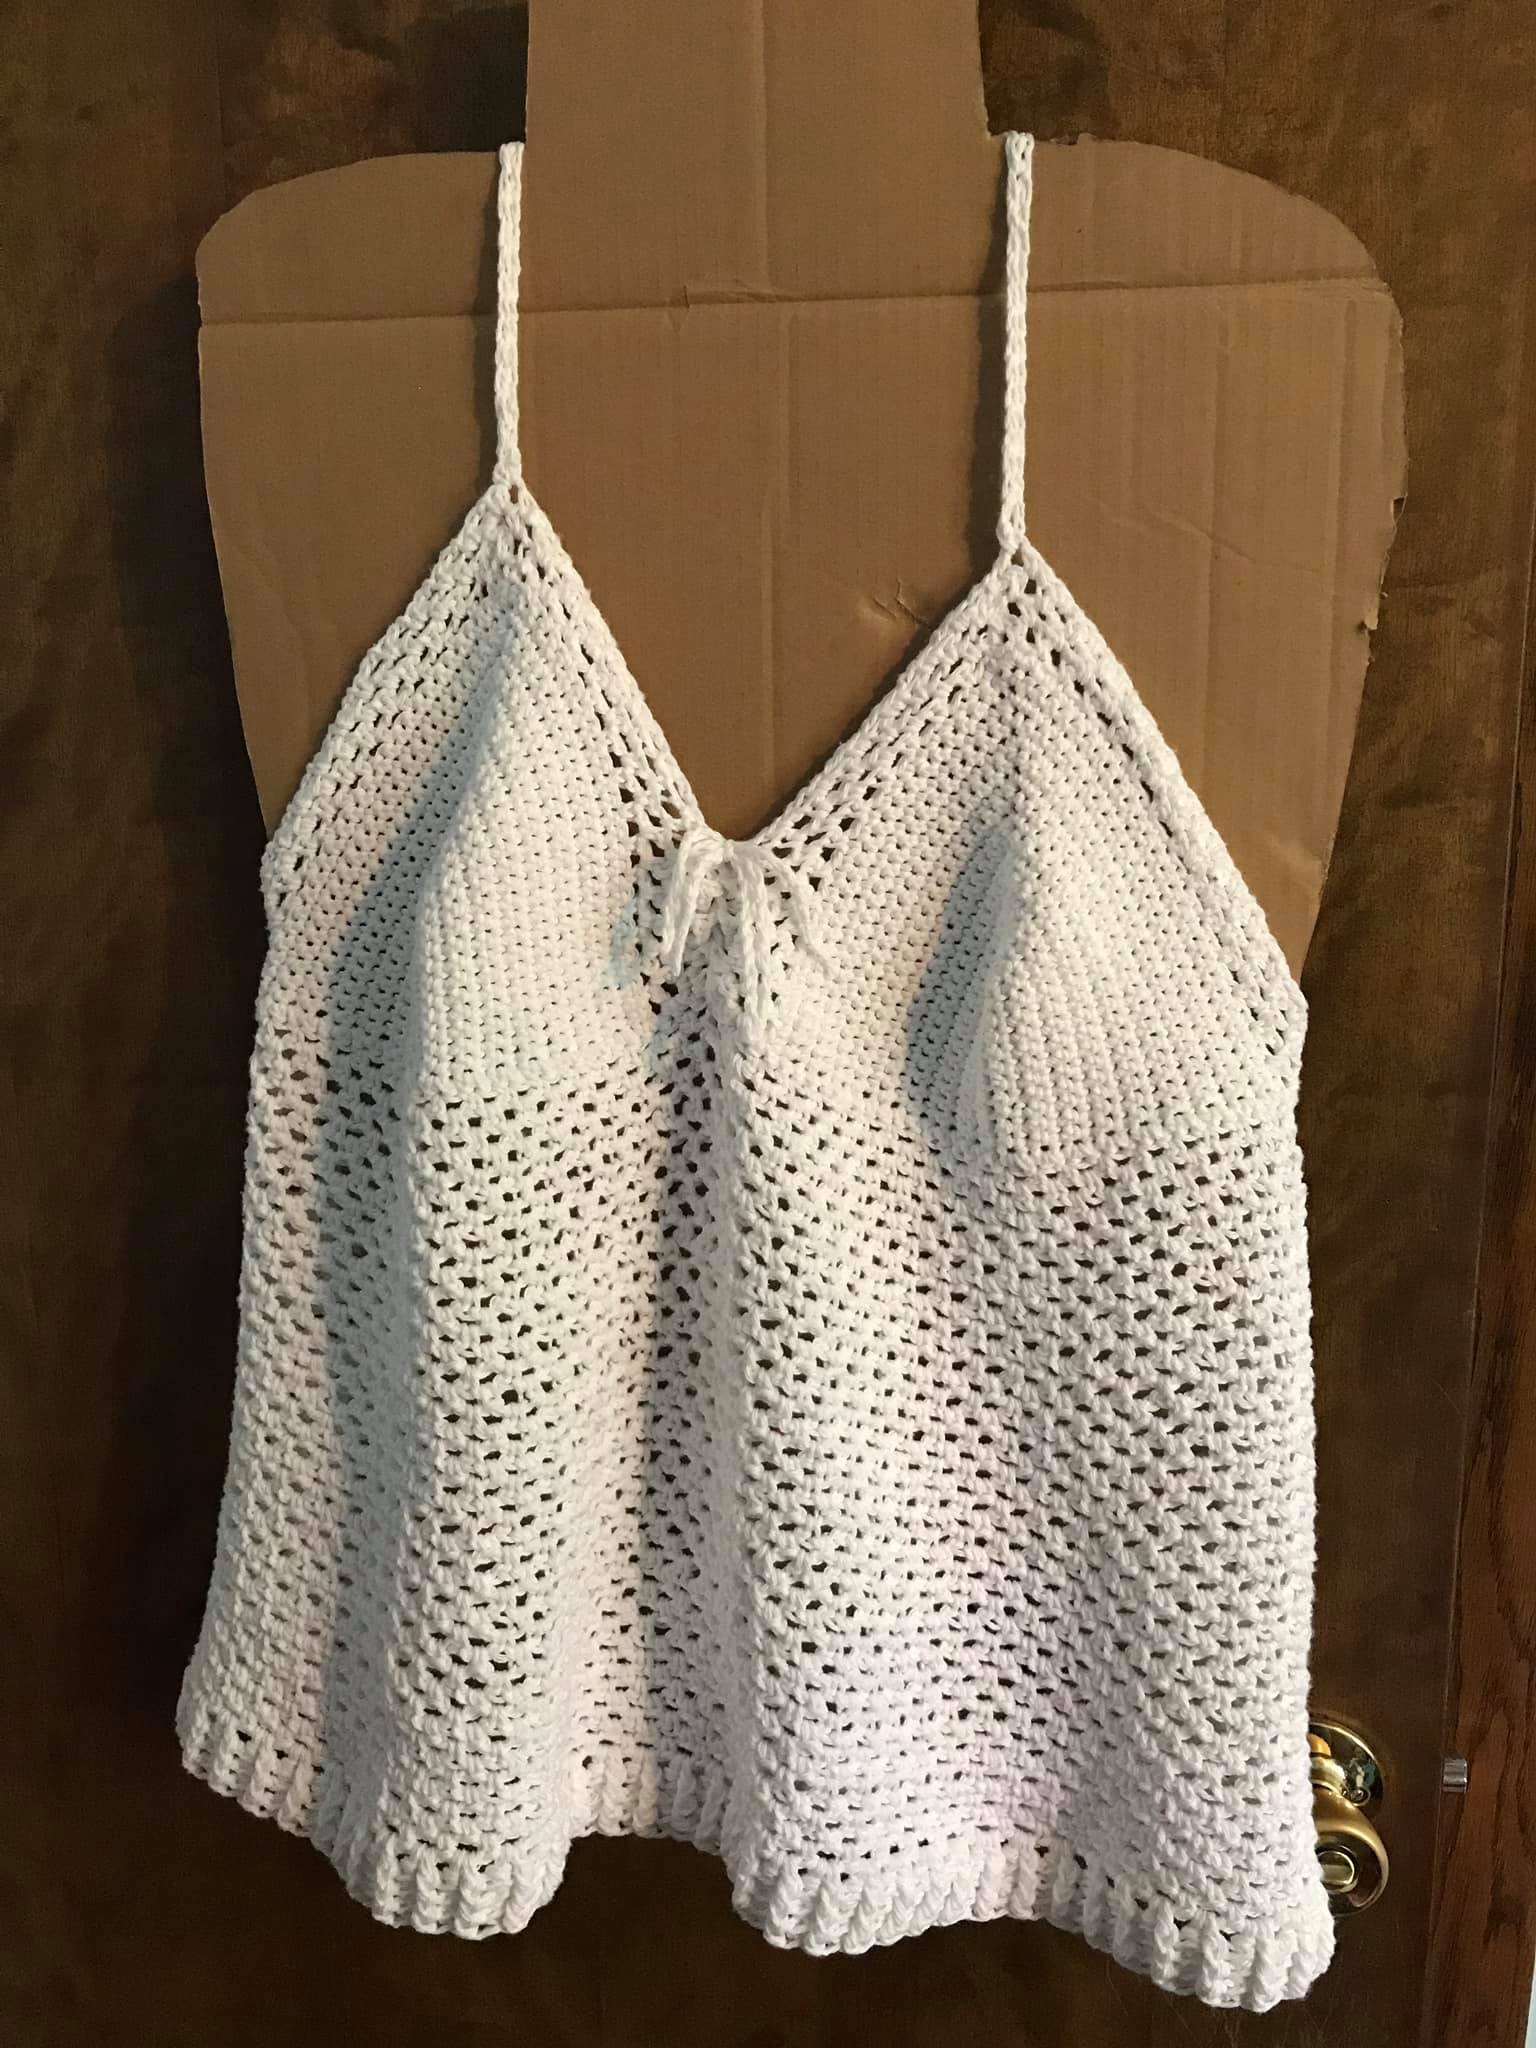
This is a guide to making this summer top. This is not an EXACT pattern, but it should help you along to be able to create this yourself.
Please do not claim this as your own design. Any similarities to other crochet tops is purely coincidental, as I tried to make something simple, yet flattering on a fluffy person (aka, me lol) You absolutely can sell anything you make from this guide. But if you get rich off this, please consider donating so that I can buy an actual body form and not use a piece of cardboard, lol.
Since this shirt is completely customized to your size, I can not state how many stitches there will be per row. But please pay attention to the notes, as some are important to making sure your shirt’s stitches line up.
Lastly, READ EVERYTHING. If something is unclear, or just isn’t working for you, please leave me a comment so I can help you! I will answer. I wrote this down after I had already made the shirt, so a lot is done by memory. so please, please, PLEASE, let me know if you find any issues.
What you will need:
Cotton yarn (I used peaches and cream in white)
amount depends on size needed.
5mm hook
Stitch markers (optional, but definitely helpful!)
Stitches used:
Ch (chain)
SC (single crochet)
SS (slip stitch)
sk (skip)
Cups (Make two):
1. ch 13, starting in 2nd ch from hook, sc 11. 3 sc in next (will be the last ch), placing a stitch marker in the 2nd sc. Continue working on the opposite side of your chain, sc 12. ch 1, turn.
2. sc in each stitch until you come to your stitch marker. 3 sc, placing stitch marker in the 2nd stitch again. continue on other side, sc in each stitch until the end. ch 1, turn.
3. Repeat step 2 until cup is large enough to fit, making sure you end with your side being an ODD number. (start counting AT the stitch marker)
4. ch 3. skipping the first and 2nd stitch, sc in 3rd stitch. [ch 2, sk 1, sc] repeat until you get to the end. *Note for the first row, the sc with the stitch marker should be one that is sc’d in, and NOT skipped.
5. ch 3, sc in the first ch 2. ch 2, sc in next ch 2. repeat until you get to the end.
6. repeat row 5 two more times.
Tips on making the correct size: use a measuring tape, or a piece of yarn. Placing the beginning between breasts, measure the length from there, to where you want the cup to end. make a mark. Use that as your reference to make sure the bottom of your cup fits exactly in the length you measured.
Now we are going to begin the bottom of the shirt. Before we begin, get an accurate measurement around your waist. This is going to be the length of your starting chain.
Bottom of shirt:
sc in next three ch 2 spaces.
continue sc until you get to the end of the cup.
Now we are going to use your measurement. take in account the cup widths and subtract the bottom length of the cups from the size you need. This will be working the back side of the shirt, so basically it’ll be a line with two cups on each end when you’re done.
ch the rest of the length that you will need making sure that the TOTAL count for this chain is a multiple of 3. The bottom of each your cups should both have a multiple of 3 also, double check, or your connecting will be off. once you get to the end of the second cup, and are sure you have a multiple of 3, ch another 35 and cut your yarn.
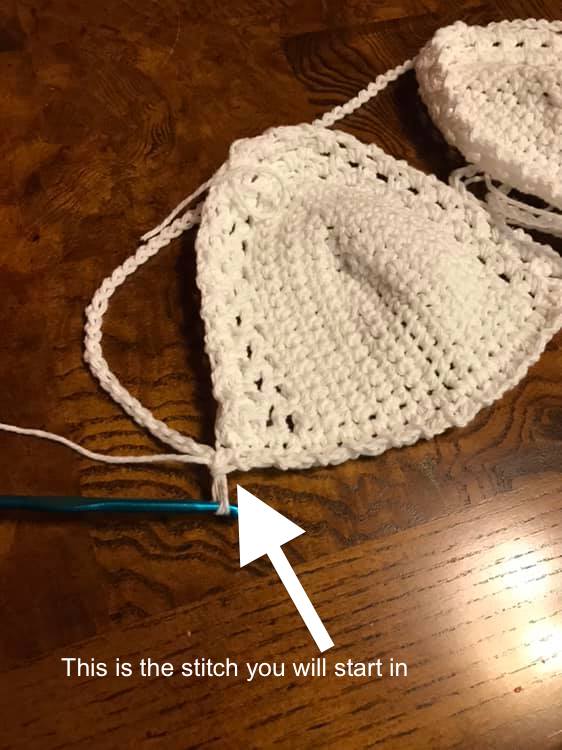
2. connect your yarn to the first stitch on the outside of the left cup so that your seam is on the side. (see photo below) working toward the cups; ch 3, sk 1, sc. [ch2, sk1, sc] repeat until you get to the last stitch on the first cup. SS to the first stitch on the next cup, making sure your chain has not twisted. ch 3, sk 1, sc. [ch2, sk 1, sc] repeat around. SS to the first ch. ch 3, turn.
3. sc in the next ch 2 space. [ch 2, sc in next ch2 space] continue around until you get to last ch 2 space. ch 2, skip the last ch2 and SS to first ch. ch 3, turn.
4-?. Repeat row 3 until the length of your shirt is how long you want it. On the very last row you work, do not finish it with a ch 3. It will be stretchy and may seem a little baggy at this point.
5. SS into the next ch 2 space. Ch2, DC in the same ch2 space. 2DC in each ch2 space around. SS to the top of beginning ch 2. Ch 2, do not turn.
6. FPDC in first stitch, BPDC on second stitch, on each stitch around. SS to the top of your ch 2. ch 2.
7. Repeat row 6 four more times. you can add more, or less rows here, depending on your preference. the ribbing should tighten it up around your hips if it was slightly baggy.
fasten off.


**FRONT TIE HOW TO; I criss crossed the strings up the rows of ch 2 spaces, skipping one stitch on each side until the front was as closed as I wanted it to be. For the last two criss crosses, I did not skip. Pull tight. Tie into a bow.


The straps can be done multiple ways, the way I have made has a criss cross back.
You can also do a neck tie style, or basic straps if you choose to. The very top of the cup should have a ch 2 space. This is the stitch you will place your strap into.
tip to making sure your straps are in the same spot on the back; lay your shirt flat with the back facing up. Starting at the tip of your cup, go directly down. mark the stitch it falls in. Count your ch2 spaces starting from the edge of the other cup, and count that many on the other side. Mark the second stitch. (you’ll be working in the ch 2 spaces around your starting chain)
Straps:
***Neck tie straps: may be the easiest option. all you would have to do is connect your yarn to the ch2 space at top of the cup, and make a chain long enough to wrap around your neck and tie into a bow. repeat for the other side.
***criss cross straps: Start at either back stitch. make a chain the length you need. it should not be too tight, or the shirt will be uncomfortable. But too loose would also be a problem. You may need to do a test length, try it on and adjust accordingly. (in my case it was 62 chains)
slip stitch to the ch2 at the top of the cup on the opposite side of the shirt. repeat for the other side, crossing over the other strap. I doubled up my strap so it wasn’t as thin, you do not have to unless you want to. If doubling, attach another piece of yarn to the back stitch, ch 1, sk 1st stitch, ch in next. ch 1, sk next, sc. repeat until you get to the top of the cup being EXTRA CAREFUL not to twist your strap. (yes, i did it the first run lol) SS and fasten off. weave in ends.
***Basic straps: Pretty much following the criss cross strap, chain the length you need to wear comfortably. Instead of attaching at the opposite side, you attach to the cup directly in front of the stitch you connected into.


AND THAT’S IT. Weave in all your ends, and you are done. 🙂